|
Household chores can be cumbersome. Cleaning every corner of the house is no fun at all. However, with the increasing amount of pollution, it is crucial that you take the right steps in keeping your home clean, especially the carpets, furniture and the curtains, which tend to accumulate a lot of pet hair, dust mites, dander, and other allergens. The only way to remove these is with a handy vacuum cleaner. If you do not like the bulky and rugged bagged vacuum cleaners, then you can always go with the cordless one like the Dyson V10 or V11. Read Here: How to Unclog a Vacuum Cleaner? However, to make sure that your home stays dust and germ-free, you will also need to know how to clean a Dyson cordless vacuum. Here is a guide on how to clean a Dyson cordless vacuum as well as some maintenance tips. Read More:
1) Emptying and Cleaning The Dirt Bin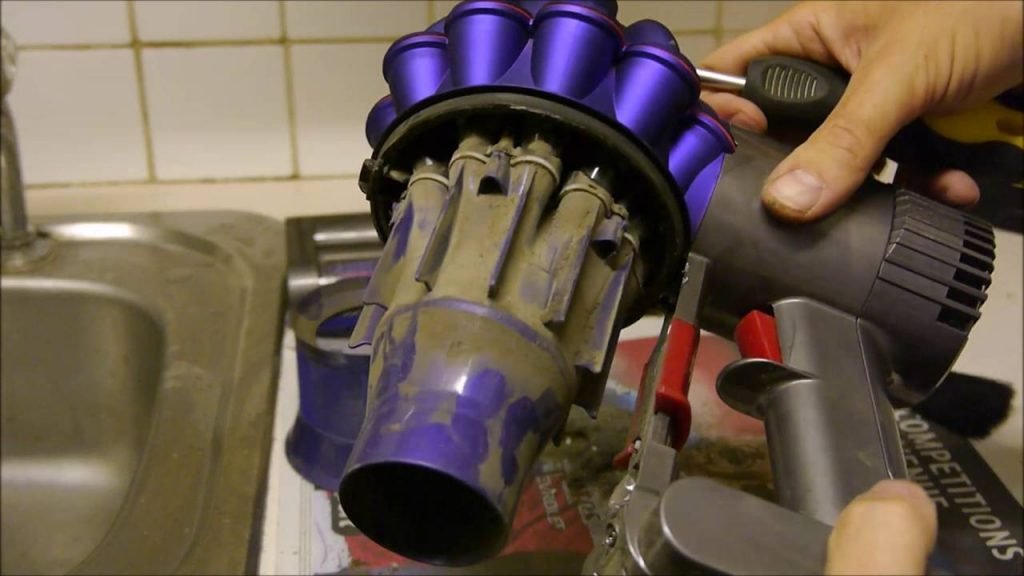
To ensure optimum performance of the Dyson vacuum cleaner, you need to empty the dirt bun as soon as dust and dirt reach the level of the Max mark. Don’t overfill. Here’s how to clean a Dyson cordless vacuum dirt bin. Disconnect it from the charger and be careful not to switch the “ON” trigger. Remove the wand— press the red wand release button and pull away from the bin. To release the dirt, you need to hold the vacuum with the bin in a downward position. Then push the red bin release button, the bin should slide down and cleaning the dirt as it goes. In order to minimize allergen or dust contact when emptying, tightly encase the clear bin in the plastic bag and empty it. Once the dirt is removed, it is time to clean the dirt bin using a damp cloth only. Before attaching it back to the machine, make sure that the bin and seals are dry. 2) Cleaning The Brush BarThe Dyson V10 and V11 Cordless Vacuum Cleaners have 2 washable brush bars you need to check and clean regularly. Here are the steps on how to clean a Dyson cordless vacuum brush bar:
Read More:
3) Washing The FilterTo wash the filter unit of the Dyson cordless vacuum you need to remove it by twisting it counter clockwise, pulling it away from the main body. Here are steps on how to clean a Dyson cordless vacuum filter unit:
It is recommended to check and wash the filter unit at least once every month. 4) Removing BlockagesThe Dyson V11 and V10 Cordless Vacuum cleaners are fully equipped with automatic cut-out. So, if any part of the vacuum gets blocked, the blockage indicator LED illuminates. To remove the blockages, allow the appliance to could down first. Make sure that it is not connected to the charging port. Detach the cleaning wand. Using a flashlight, look inside the tube. Push the blockages out using a straightened coat hanger or the stick of the broom. In addition, you can also clean the wand with running water and soap. Leave it to dry before attaching it to the machine and using the vacuum cleaner. Read More:
Maintenance Tips1) Charging Turn off the vacuum cleaner. Place it on the docking station. After that, plug in the docking station and turn it on to charge the vacuum cleaner. Take note that the vacuum cleaner needs to be fully charged before the first use. Recharging can take up to 3.5 hours. Use only Dyson chargers to charge your Dyson V10 and V11 cordless vacuum cleaners. Also, use only Dyson batteries since other types of batteries can burst to cause damage and injury to persons. 2) Vacuuming Properly Here are some tips on how to use the Dyson Cordless Vacuum Cleaners properly:
Other Tips
Read More:
The post How to Clean and Maintain the Dyson V11 and v10 Cordless Vacuum appeared first on Relentless Home. via Relentless Home https://relentlesshome.com/how-to-clean-dyson-cordless-vacuum/?utm_source=rss&utm_medium=rss&utm_campaign=how-to-clean-dyson-cordless-vacuum
0 Comments

Your vacuum cleaner helps in keeping your home smelling nice and fresh by getting rid of dust, dirt, dander, and other particles stuck on your floor and in your carpet and upholstery. However, since they suck in all the dirt, they become the new hub of all those dust and germs from all over your home. And if you don’t regularly maintain it, that cleaning machine can start to contribute to the mess in your home, emitting a nasty smell. Read here: 10 Best Vacuum Cleaners Under $300 In this article, we will show you the main causes of smelly vacuums as well as steps on how to make your vacuum smell good again! Read More:
4 Causes of a Smelly Vacuum1) Pet HairIf you have fur babies around, their coat and hair might be the main cause of a smelly vacuum. Pet dander and hair are already smelly and when you vacuum them, they will carry the odor inside the device. Not only that, but pet urine can also add a stronger stench. Although it is unlikely that you will vacuum your pet’s accident directly, the liquid can stick to dust and pet hair. Once vacuumed, this combination of pet hair and dried urine can create the best recipe for a nasty, musty smell. 2) Mold AccumulationsDon’t have any pets? You’re still not exempted from smelly vacuum cleaners. Mold particles are usually found in vacuum filters and bags. If left unattended, this can create a strong smell that you might be quite familiar with (the strong musty smell in the basement). Mold loves humidity and moisture to grow. Now, if you tried to vacuum a wet carpet or cleaned the vacuum bag with water then used it before allowing it to dry, then you are welcoming mold into your vacuum cleaner. 3) Excessive DustYou don’t just vacuum dust. When vacuuming, dirt and other pieces of debris also join the ride. Whether you are catching used coffee grinds or dried food mess, they all contribute to a strong, smelly vacuum. In addition, letting too much dirt and dust accumulate in the dust bin or dust bag can eventually impact the life of your vacuum cleaner. Read More:
4) Burnt BeltThe vacuum belt may also cause a foul odor. Made of rubber, belt allows the brush to roll, capturing dirt, hair, and dust. Without proper caring and maintenance, the dirt and hair stuck within the brush bristles can prevent the brush from rotating properly which damages the rubber. Also, the belt can get caught on the brush as well. Overused and stretched belts produce a burning plastic smell. How To Make Your Vacuum Smell Good1) Cleaning The Dust BagThe first tip on how to make your vacuum smell good is to always clean the dust bag or dirt canister. Always dispose of accumulated dirt on the canister or bag before it is even full. After that, do it a habit to always clean your dust bag or canister with freshwater or as per the manufacturer’s instruction. Just make sure that the bag or canister is completely dry before putting it back to the vacuum cleaner. 2) Cleaning The FilterVacuum filters are the ones keeping dirt, allergens, and dust out of the air. Thus, they too can become soiled and dirty. It is recommended that you clean your filter as per your manufacturer’s instructions. Or if it is too soiled, then it is recommended that you replace it to keep your vacuum cleaner in optimal shape and increase the filtering efficiency. In general, it is recommended that you change your vacuum filter every 3 – 6 months. Read More:
3) Cleaning The HoseAnother way on how to make your vacuum smell good is to clean the vacuum hose or tube. This is one of the first places where dirt and dust pass through before reaching the vacuum’s filter, dust bag, or dirt canister. Furthermore, small particles usually get stuck within the inner tube or hose, causing a clogged hose. Over time such clogging can cause decay, creating an unpleasant odor. To prevent this, you just need to remove any clogging and cleaning the hose with water or liquid soap or as per manufacturer’s instruction. 4) Cleaning The BrushesThe vacuum’s rotating brushes need to be maintained and cleaned at least once or twice a year. They are often used to clean carpets and rugs, accumulating a large amount of dirt and dust on their own. To clean the brush, you just need to cut and remove and hair stuck within its bristles. After that, pull out strands of hair as well as dirt. Wash the brush with soapy water or as per manufacturer’s instruction. Read Here: Shark Vacuum Not Sucking – How To Fix It 5) Using Perfume PadsFor the more personal approach on how to make your vacuum smell good, there are perfume pads available in various sizes and aromas. Check the accessibility and size of your vacuum filter before you choose the perfume pad. In most cases, perfume pads can be inserted into the vacuum filter. The purpose of these perfume pads is to release the aroma into the air whenever you use the vacuum cleaner. Read More:
6) Sprinkling Baking Soda or CinnamonIf you just want to neutralize the smell from your vacuum cleaner, you can sprinkle a teaspoon of baking soda into your vacuum dust bag or dirt canister. Baking soda prevents bad smells from coming back out to your home. Or you can also sprinkle a small amount of powdered cinnamon to counteract the smell of dust and dirt that the vacuum picks up while providing a fresh, sweet scent. If you don’t like cinnamon, you can try other items such as dried orange rind or coffee beans to pre-fill your vacuum dust bag or dirt canister and provide some level of odor protection. Make it a habit to sprinkle cinnamon and baking soda or other odor-protecting items to your vacuum bag every time you change or clean it for the best results. Cleaning It OffWhen used regularly, vacuum cleaners will start producing an unpleasant odor. We hope these tricks can help keep your vacuum in good condition and always smelling fresh, so you and your family can enjoy a clean and safe environment to live in. Read More:
The post How To Make Your Vacuum Cleaner Smell Good appeared first on Vacuum Cleaners. via Vacuum Cleaners https://relentlesshome.com/how-to-make-your-vacuum-smell-good/?utm_source=rss&utm_medium=rss&utm_campaign=how-to-make-your-vacuum-smell-good 
For your vacuum cleaner’s performance to be up the mark, the engine or pump needs to be working efficiently. The pump has moving parts which tend to fail overtime as a result of normal aging or wear and tear. Here’s a guide on how to repair your vacuum cleaner engine. Read More:
Covering The BasicBefore we teach you how to repair your vacuum cleaner engine, first you need to know how a vacuum works and a few basic things you will need to repair the engine or pump. The vacuum cleaner has a fan where a motor is attached. When the fan rotates, suction is created, pulling in the polluted air as well as debris and dirt. Then, a porous bag in the vacuum cleaner filters out the dirt-filled air stream. Read More: Shark vs Dyson Vacuum Comparison Now, to repair your vacuum cleaner engine, you will need to use pliers and screwdrivers. 1) DisassemblingStart by removing the handles, getting rid of filters, and taking out the switch assembly. Be careful not to disturb the electrical connector which is typically underneath the switch assembly. Remove the vacuum case that’s protecting the interior in order to access the core engine. This is much easier if you unscrew the neighboring motherboard so it can move freely and you get to work where needed, instead of removing it completely since you will have to rewire everything back which can be tricky if you have no experience. In most vacuum cleaners, it’s not necessary to remove any rubber bumpers surrounding the cord wires or machine. Take note: You need to be gentle in removing the parts as the little pieces and bits are fragile. Also, remember where all items were previously positioned, more importantly, the screws. Now that you’ve released the vacuum cleaner’s pump cabinet, take the motor out of the vacuum. Some models will have a motor chamber that contains all motor assembly while others only have a motor shell. Read More:
2) Cleaning and Fixing Engine PartsAt the end of the motor, you’ll see a metal shield. Tap it lightly to expose the blower fan. Remove the nut holding the fan in its position. This should allow you to remove the flat spacer washer and the aluminum blower. Gently lift the carbon motor brushes out. These are typically held in place with the spade connectors so you can seamlessly pull them out directly. The motor brushes should look solid and long. From there, you should see 2 types of housing— the stator housing which holds that female spade socket and the brass housing which holds the male spade connector. Once the brushes are removed, you can clean them with the electrical cleaner or replace them altogether to get the best out of your vacuum cleaner. Take note: If you decide to replace the brushes, always replace both of them at the same time. After the brushes, you can now remove the vacuum engine stator by pressing down on the metal spring clip which fastens it in place. The stator should slide out easily. There should be an electronic controller attached to the stator. You should clean up any dust or dirt residue on the inside of the stator and its housing, contributing to the optimum performance of your vacuum cleaner. After the stator, you’ll have to carefully pull out the rotor. It should have bearing on either end in addition to the lower bearing that’s pressed into the housing which you also need to pull out carefully. Make sure not to lose the flat small spring washer and that the rotor should be removed in one piece. You might also notice the commutator found at the end of the rotor. These are rings of copper strip which can be super dirty, which are the common cause of faulty vacuum cleaner engines. To fix this issue, you need to mount the rotor in a mini lathe (if you have one). Using wet and dry fine sandpaper, sand down the end of the commutator. The commutator doesn’t need to be perfectly smooth and should operate just fine if there are a few small scores present. Use only feather-like strokes in order to sand down the commutator and be careful not to sand a lot away. Next is the aluminum blower that will most likely be clogged with dust. You need to unclog it to improve the overall functioning of the vacuum cleaner. One swift push around some fins with long cable tie should do the trick in addition to an electric cleaner. Read More:
3) Repairing The Electronic GearsTo repair your vacuum cleaner engine electronics, you need to be extremely careful since there will not be much that’s attached as well as a few loose main connections will be exposed. The electronic structure of the engine is simple, containing the thermal cutout of the device as well as a triac with 20 – 30 amp. Ensure that all the triac wires are connected to the body. Also, ensure that all parts of the plastic clips holding the connectors together are not compromised, wrapping the connector in electrical tape to securely hold it together. See if the fuse is intact, otherwise, you need to replace the fuse and check to see if the connections in the plugs are okay. 4) ReassemblingOnce you’re done with all the cleaning and repairing, it is time to re-assemble the engine. Make sure that all parts are completely dry before reassembling since you don’t want to risk short circuitry. Restore all the pieces and screws back to their rightful places and take your time while doing it. Double-check to confirm that everything is back in place and that all wiring is intact. Read Here: How to Unclog a Vacuum Cleaner? After reassembling, plug the vacuum cleaner to an outlet and turn it on. It should be able to function properly and correctly unless you made some mistake during the repairing and reassembling process. In such a case, you’ll need to disassemble it once again or take the vacuum cleaner to a qualified professional in order to repair your vacuum cleaner engine. The post How To Repair The Engine/Pump of a Vacuum appeared first on Vacuum Cleaners. via Vacuum Cleaners https://relentlesshome.com/how-to-repair-the-engine-pump-vacuum/?utm_source=rss&utm_medium=rss&utm_campaign=how-to-repair-the-engine-pump-vacuum 
Ahh. Vacuum cleaners— what would we do without them? One of the best and high-end manufacturers of powerful vacuum cleaners is Shark. However, regardless of how high-end your vacuum cleaner is, it can be worthless over time if you do not ensure proper maintenance. Stop for a moment and think about what a vacuum cleaner does for you. It absorbs and sucks a large volume of dirt, debris, dust, pet dander, and small particles that would otherwise make your home very dirty. Such accumulation gives your vacuum cleaner prone to clogging or losing its efficiency. Read Here: Shark Vacuum Won’t Turn On – How To Fix It One of the most common things you can do to increase your Shark vacuum’s lifespan and efficiency is regularly emptying and cleaning its dirt bin. Considering the importance, in this article, we’re going to explain when and how to empty Shark Vacuum cleaners. Read More:
When To Empty And Clean Shark Vacuum Cleaners?This will depend on how frequently the user uses the Shark vacuum cleaner as well as how clean or dusty your home can be. So, it wouldn’t be useful to tell you to empty your vacuum cleaner on a monthly or weekly basis. However, a useful feature of the Shark vacuum cleaner is that they have an indicator when it is time to empty the dirt bin. Check the label for the indicator light, usually turning red when it has reached the maximum level of accumulated dirt or dust. For the cordless Shark vacuum cleaner, it features clear or transparent dirt canister with lines, so you can better see when it’s time to empty the canister. Now, if you have one of the old models without an indicator, then there are signs that will tell you when the dirtbag is already full and it is time to empty the vacuum cleaner:
How To Empty Shark Vacuum?1) Unplug the Device First off, you need to ensure that the Shark vacuum cleaner is disconnected or unplugged from the outlet. If you have the Cordless Shark vacuum cleaners, then make sure to remove the battery. After that, find a spacious place for cleaning and emptying the vacuum cleaner. 2) Opening The Device The opening features of Shark vacuum cleaners may vary by model. In general, you only need to open the bin, hold the handle that is adjacent to the bin, and grasping it open. 3) Separating the Dust Container Once you opened your device, you should be able to see the dirt bin or dust container. Remove it from the device. 4) Removing the Pre-Motor Filters Most Shark vacuum cleaners will come with pre-motor filters. Since they’re already out, perhaps you’d also like to clean them up to further optimize the performance of your vacuum cleaner. If you’re unsure of how to clean the filter, check for the user’s manual. Read More:
5) Emptying The Canister After removing the filter, you need to pull out the bin. Press the button near the bin, then using the handle, pull it out from the device. Empty the debris and dust into the trash can. After that, you can use clean water in order to remove all sorts of dirt and dust from the canister and its filtration system. Make sure to rinse it by putting it under running water. 6) Air-Drying After cleaning the canister and its filtration system, allow it to air dry for at least 24 hours. Do not try to put the dust container and filtration system back into the vacuum cleaner while wet. Otherwise, mold and mildew can grow and cause strong musty odor when using the vacuum cleaner. Once dry, you can finally put it back into the vacuum cleaner. Tips For Cleaning Different Shark Vacuum ModelsAs there are a wide variety of Shark vacuum models, the procedure for cleaning can vary from one another. Thus, you may need to pay closer attention to what you use and how to properly empty and clean the parts of your device. Read Here: 10 Best Vacuum for Hardwood Floors and Carpet Here are a few tips on how to empty Shark vacuum of varying models:
To empty this Shark model, you need to start by sliding the dirt cup release tab at the top of the cup itself. Hold it over the trash bin and release the dirt. In order to open the dust cup, simply press the lower release tab. In order to make sure that all debris and dirt have been emptied, open the dust cap from the top and press the upper release tab. Rotate it upside down over the trashcan. After that, place the dust cup back into position.
Separate the dirt cup from the rest of the device. You can press the dust cup release button or pull up the dust cup release latch which is usually located near the top of the cup, depending on the model. Hold the dirt bin over the trash bin and press the bottom release button located at the front side to empty dirt. Ensure to close the dirt bin properly before placing it back into the device.
Separate the hand vac from the wand or separate the dirt bin from the hand vac. After that place, the dirt cup over the trash can and push the release button in order to empty debris and dirt. Put the dirt bin back into position.
Press the release button located near the want to remove the dust cup from the device. Empty it over the trash bin by pressing the lower release tab. There’s also a release tab on the upper part so you can hold the dirt bin upside down over the trash to empty the debris. Put the dust bin back onto the unit.
Separate the hand vac from the wand with the release button. Hold it over the trash bin and press the dust cup release button to empty the debris and dirt. Then, close the dirt bin and put the hand vac back to position Read More:
The post How To Empty Shark Vacuum -Step by Step Instruction appeared first on Vacuum Cleaners. via Vacuum Cleaners https://relentlesshome.com/how-to-empty-shark-vacuum/?utm_source=rss&utm_medium=rss&utm_campaign=how-to-empty-shark-vacuum 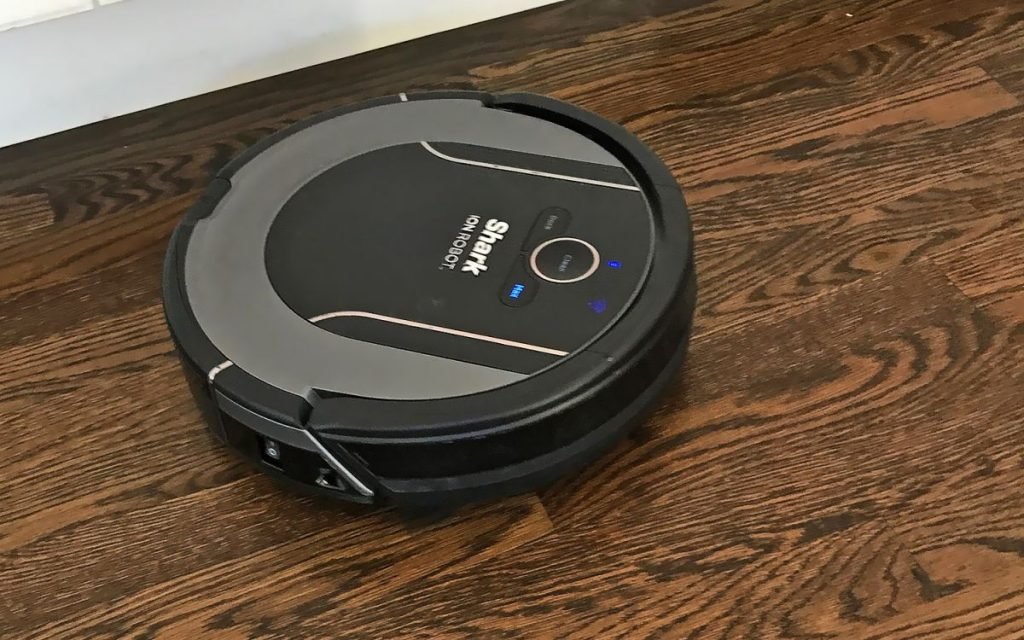
Having a clean home is a must. However, with your work and schedules getting in the way, it is no longer surprising if some people decide to use the modern approach in cleaning— the smart cleaning robots like the Shark Ion Robot. Read More:
Shark Ion Robot: What Is It?Whenever you need a bit of cleaning but simply can’t because of work or other things you need to do, a robot vacuum cleaner will definitely save the day. The Shark Ion Robot is the best solution for your daily problems in terms of home cleaning. This device features an easy-to-use mobile application that allows you to monitor and use the device anytime you want. The Shark Ion Robot boasts a self-cleaning brush roll that collects hair, dust, allergens, and dirt to clean your home and prevent a daily build-up of this dirt in your home. It even features the Smart Sensor Navigation, allowing you to seamlessly navigate the floors and carpet while its proximity sensors continuously assess the surroundings to adapt to obstacles. Read Here: 10 Best Vacuum for Hardwood Floors and Carpet Meanwhile, the dual spinning side brushes are also present, so it can clean out debris and dust from edges and corners Thanks to its Wi-Fi connectivity and optional cleaning scheduling, you should not have any trouble keeping your home clean every day. While the Shark Ion Robot can be super effective in cleaning your home, sometimes, however, they also tend to have their mood swings, malfunctioning, or doing things they are not supposed to do. And sometimes, the only thing you can do to ease their mood swings is by resetting them back to normal. In that case, you might be wondering how to reset Shark Ion Robot. But first… Factory Reset: What Exactly Is It?A factory reset is a useful troubleshooting feature that will send your Shark Ion robot back to its original factory settings. This means that it will delete all robot data including schedules, maps, Wi-Fi credentials, preferences, and settings. When performing the factory reset from the Shark Ion Robot app, which is always recommended, the action will also remove the device from the app, returning all language selections, time-zones, cleaning preferences to their default state. Read Here: 10 Best Vacuum Cleaners Under $300 Not only that, but it also disassociates the device and any of its save data from your app account and removes any current 3rd party Smart Speaker connection. However, if the factory reset is performed from the device itself, app data, cloud data, and all its account associations will stay intact. Read More:
Reasons To Do A Factory ResetA factory reset of the Shark Ion Robot is usually recommended in the following scenarios: 1) Vacuum Not Connecting To The Wi-FiIf you have a newly-bought Shark Ion Robot, then it might take a lot of tries before you can connect it to the internet successfully. You only need to make sure that you’re using the recommended frequency that your robot vacuum needs. You can also try to reset your router to see if the device can connect. However, if you still can’t connect to the Wi-Fi network and could not find the reason why resetting the Shark Ion Robot can be your last resort troubleshooting step. 2) Software IssuesLike any other digital device out there, the Shark Ion Robot vacuum cleaner needs a software program in order to operate properly. Now, if one day it does not work properly or seemingly spins around without ever cleaning at all, then it seems to be a software issue. Such software issues include:
These signs could indicate that your robot is actually dealing with excessive data in its memory. In order to resolve this problem, it is recommended that you give your Shark Ion Robot vacuum cleaner a reset so that it can remove all unnecessary information that makes it struggle from its performance. 3) Re-selling The Shark Ion RobotIf you are planning to sell your Shark Ion Robot or transferring ownership of the robot to another user, then you will need to know how to reset Shark Ion Robot and resetting it to its default setting before turning it over to the new owner. Read More:
How to reset Shark Ion RobotThere are 2 main ways on how to reset Shark Ion Robot vacuum: 1) Factory Reset via the AppThis is the most recommended way to factory reset your Shark Ion robot. AS mentioned above, this will remove the robot from the App as well as any saved data from the cloud. You can use the following procedure to factory reset the Wi-Fi connected Shark Ion Robot:
2) Factory Reset via the Shark Ion RobotIf you can’t connect to the Wi-Fi network, then you will need to do a factory reset on the Shark Ion Robot itself. Fortunately, resetting the Shark Ion Robot is easy and simple.
Read More:
Final ThoughtsAlthough a robot vacuum can help a lot in terms of cleaning your home, it can still malfunction like any device ever created. However, with the simple guide from above, you should be able to troubleshoot the problem and solve the issue, so you can make the most out of your Shark Ion Robot vacuum cleaner. The post How To Reset Shark Ion Robot- Simple Instructions appeared first on Vacuum Cleaners. via Vacuum Cleaners https://relentlesshome.com/how-to-reset-shark-ion-robot/?utm_source=rss&utm_medium=rss&utm_campaign=how-to-reset-shark-ion-robot 
We all love our fur babies. But, having pets at home has this one inevitability— urine everywhere. On walls, furniture, and their favorite spot— the cozy carpet. There is no going around this unless you train your fur babies to do their business in a particular area— this will be a never-ending cycle. So, when your pup positioned and peed on your new carpet, the key here is not only cleaning up his urine but also removing the odor. Because if you don’t, he’ll pick his scent and will take a piss on that one area all over again. Think of it as marking territory. He peed on it. It’s his. A little animal psychology. And in this article, we will show you how to get dog urine smell out of the carpet. But first… Read More:
Pheromones and What Neutralizes it?Dog urine contains pheromones. It is a part of a complex system that dogs use to communicate. These pheromones teach dogs respectable places and boundaries to urinate. So, once your pup had an accident in the house, catching a whip of those pheromones can encourage him to urinate in that one spot again. For you, you’d smell a foul odor caused by bacteria in the urine which produce ammonia. If you can’t see it, then using a blacklight or UV light can help you find it to ensure proper cleanup. So how do you neutralize this smelly urine odor and its pheromones? Enzymatic cleaners. They destroy the enzymes and proteins that make up the pheromones in your pup’s urine. Not only can it help remove the smell, but it also reduces the chances of your pup being a repeat offender in that spot. Read Here: 10 Best Vacuum for Hardwood Floors and Carpet However, there are also home ingredients that you can use on how to get dog urine smell out of the carpet. Homemade Solutions For Urine StainFor people who do not want to spend money on potentially harmful ready-made chemical items and want to go the DIY route, then here are some homemade solutions for urine stains you can try. Vinegar + Baking Soda Vinegar acts as the cleaner while baking soda helps absorb the stain. To use this duo effectively, you need to pour the vinegar first then add the baking soda. If you do it baking soda first, you will have a bubbly mess in your hands. Water + Vinegar + Baking Soda + Hydrogen Peroxide + Liquid Dishwashing Detergent This is a 3-step solution. First, you mix water and vinegar and treating the stained area with this mixture. Then you sprinkle baking soda over the affected area. After that, a mixture of 1 teaspoon liquid detergent and 1 cup hydrogen peroxide is applied on the carpet, allowing it to dry. Read More:
How To Get Dog Urine Smell Out Of Carpet1) Fresh StainsWhen you caught your pup, doing something he shouldn’t be doing in your carpet, you need to make a firm “No” in a commanding voice, so that he will slowly learn that peeing on your carpet makes him a bad dog. Then, quickly remove the fresh urine to lessen stain and odor afterward. To do this, use paper towels to absorb the urine. Stand on the pile of sheets, allowing it to absorb as much urine as possible. Do this until the area is dry. Then use an enzyme cleaner to remove any lingering pheromones in the spot. If you do not have an enzyme cleaner, you can use clean water with homemade solutions, then blotting it dry afterward. Then, use a wet/dry vacuum cleaner to clean up all dirty baking soda residues. Quick tip: Take the urine-soaked paper towels into your pup’s designated bathroom zone or pee zone so that they are more inclined to do their business there. Wait, can’t I use a towel instead? Sure, you can. However, the paper towel has a dual purpose. First off, it helps absorb the urine, then it allows potty training. AS mentioned before, dogs will pee on the same spot over and over again until the odor is gone. In order to prevent this from happening, the urine scent should be eliminated and enticing your pup with the pee-soaked paper towel, placing it to the designated pee zone so that they learn where they should do their business. 2) Pet Stains That Have SetNow, for pet stains that already dried up and have already set deep into your carpet fibers, spotting the urine stains can be tricky. You can use ultraviolet black light to spot in order to detect all the soiled areas. Then mark those areas with chalk. If a blacklight is not available, then you can try these alternatives:
Once you find the soiled areas, clean it with a carpet cleaner. Don’t use steam cleaners since heat bonds the protein of urine to any human-made fiber which causes the stain and odor to permanently set. After vacuuming the stains, treat these areas with enzymatic cleaners or your DIY solutions. However, if stains are still present, you can try using carpet stain removers available on your local grocery stores. Once the carpet is dry, use a vacuum cleaner to remove cleaner residues such as baking soda. Read More:
Cleaning The RugsCarpets are not the only favorite pee zone for your pets. Rugs, too, had it rough. To clean up rugs, you can just place them in a washing machine. Add a pound of baking soda together with the detergent mixture in order to help remove the odor. After a cleaning cycle in the washing machine, smell the rugs for traces of urine odor. If you can still smell it, put it back in the washing machine, and do another cycle. Only this time, wash them with an enzymatic cleaner to help break down the nasty urine odor. The post How To Get Dog Urine Smell Out Of Carpet? appeared first on Vacuum Cleaners. via Vacuum Cleaners https://relentlesshome.com/how-to-get-dog-urine-smell-out-of-carpet/?utm_source=rss&utm_medium=rss&utm_campaign=how-to-get-dog-urine-smell-out-of-carpet 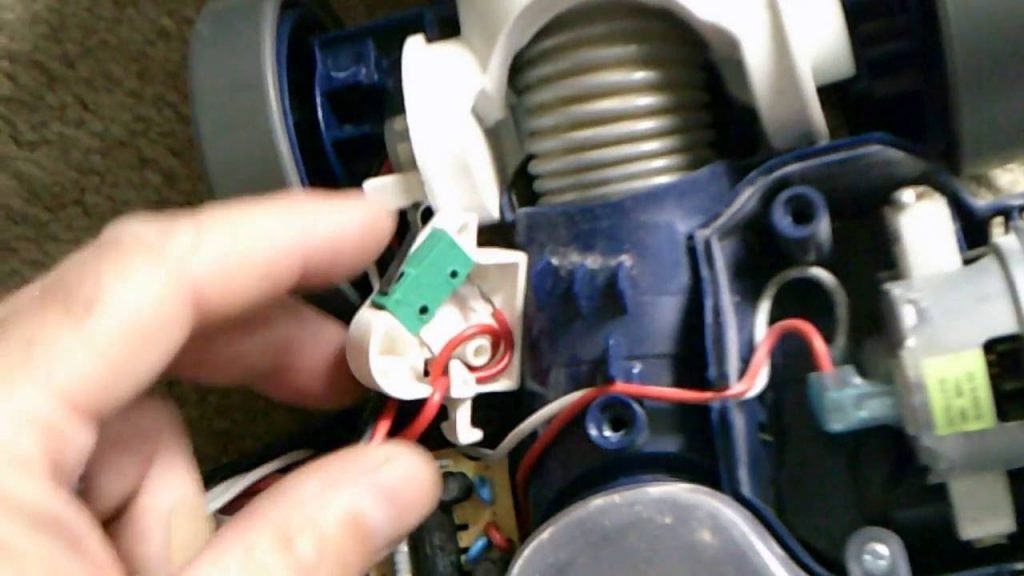
Shark is one of the favorite vacuum cleaner brands— mainly because they are powerful as Dyson-made cleaners but are pocket-friendlier. However, like pretty much anything out there, Shark vacuum cleaners can sometimes malfunction and you will eventually run into small issues here, and there including a Shark vacuum won’t turn on. Fortunately, there are fairly simple explanations and solutions, too. Read More:
What should you do when your Shark vacuum won’t turn on?1) Power Plug This is probably the simplest reason why Shark vacuum won’t turn on with the easiest solution. Most of the time, you just did not plug the vacuum cleaner into the outlet correctly. So, check if the power plug is securely connected to the power outlet by wiggling the cord in order to check if the plug doesn’t fall off from the outlet. Otherwise, give the plug a push into the power outlet in order to secure it in place. Read Here: How to clean shark vacuum filter – A Step by Step Instruction 2) Vacuum Cord If the vacuum still won’t turn on after, then you need to look at the cord itself, which might be cut or faulty. A damaged or faulty cord is common in the older vacuum cleaners with the damaged electrical wires inside the cord preventing power from getting to the vacuum cleaner. Check the entire length of the vacuum cord for any cuts which can be stopping the electrical power from moving to the machine. If you suspect an issue with the cord, then unplug the vacuum cleaner from the outlet in order to avoid fatal electrical shock. You can easily repair or replace a cord, depending on the extent of its damage. 3) Vacuum Switch If the plug is securely connected to the outlet, the next thing you need to look at is the vacuum switch. AS obvious as it may seem, sometimes you need to check whether the switch is actually on. If it’s on and the Shark vacuum still won’t turn on, then it could be a faulty switch that needs replacing. Read More:
4) Circuit Breaker Vacuum cleaners are notorious for tripping circuit breakers. This is usually caused by electrical arcing that happens when electricity skips a gap between 2 conductors. Usually, these conductors are 2 pieces of exposed wires. Arcing doesn’t usually trip a normal circuit breaker. However, it can easily trigger the AFCI (arc fault circuit interrupter), which is an advanced type of circuit breaker. If your vacuum cleaner has an AFCI, then it senses even the slightest sign of arcing in order to prevent dangers like electrical fires. When powered, the vacuum cleaner will produce small sparks, which are tiny electrical arcs. As such, they can sometimes trip your AFCI circuit breaker and preventing the vacuum cleaner from turning on. Whether you have a GFCI or AFCI outlet, you will need to check whether the breakers have tripped. If so, then the reset button on the outlet should have gone off. You can simply reset the breaker by pressing the reset button. Now, if you have a normal outlet— doesn’t have a reset button— then you’ll have to check whether your home’s circuit breaker panel has tripped. If so, simply switch on the reset button. Read Here: 10 Best Vacuum for Hardwood Floors and Carpet Tripping of the outlet breakers or circuit happens sometimes, however, if your Shark vacuum regularly trips the breaker, then it could be a sign of an electrical issue in the machine. Some signs of electrical issues to check for include:
5) Suction Motor Thermostat Some Shark vacuum cleaners like the Rotator model has a thermostat. This comes in handy in preventing the vacuum’s suction motor from the effects of excessive heat. Vacuum cleaners are prone to overheating for various reasons. Vacuuming while the dust canister is full not only reduces the efficiency of the vacuum but also lets excessive dirt into the inner parts of the machine. This forces the motor to work harder leading to overheating. By emptying the bin regularly, you can minimize the risk of your vacuum cleaner overheating. In addition, blockages in the brush bar, attachments, and hose can also prevent airflow and causes the motor to work harder. Clogged up or dirty filters can also have a similar effect on the vacuum cleaner. Blockages in vacuum cleaners are especially common if you have pets that constantly shed their furs. Removing any blockages and cleaning or replacing clogged up or old filters can prevent overheating. Now, when overheating, the thermostat shuts off the vacuum in order to let the motor cool down and prevent further damage from the excessive heat. You can get your vacuum cleaner back on by resetting the thermostat. Here are the steps:
Read More:
6) Motor Vacuum cleaners have motors. And motors can eventually break down. No motor lasts forever. And they have lots of moving components which can also break over time. If the problem of your Shark vacuum won’t turn on is the motor itself, then you’ll need to bring it to a professional for repairs. However, in most cases, if the motor already gave up, it is usually cheaper to just get a new Shark vacuum cleaner altogether. The post Shark Vacuum Won’t Turn On – How To Fix It appeared first on Vacuum Cleaners. via Vacuum Cleaners https://relentlesshome.com/shark-vacuum-wont-turn-on/?utm_source=rss&utm_medium=rss&utm_campaign=shark-vacuum-wont-turn-on 
Shark vacuum cleaners are a must-have in every home, thanks to their cleaning power. However, in order to keep them working efficiently, you also need to clean them once in a while. And while the hose, attachments, and dust bins are the most common items washed and cleaned on a daily basis, cleaning your vacuum filter is also crucial for optimal performance and increasing the vacuum’s lifespan. In this article, we will show you how to clean Shark vacuum filter properly. As you know, most people do not clean it the right way, leading to reduced lifespan and efficiency of the vacuum cleaner. But first… Read More:
How Often Should You Clean The Filter?According to manufacturers, vacuum filters should be cleaned every 3 months. Meanwhile, the HEPA filter can run for 2 years without any issues. However, if you find the vacuum cleaner’s efficiency dropping, then you might want to clean or replace the filter sooner. With that said, you will need to remember to clean and maintain your Shark vacuum filter 4 times every year for it to do its job well. Then again, even if you put it on your calendar reminder, you’d still probably miss a date or two. Read Here: Shark Vacuum Not Sucking – How To Fix It Fortunately, there are some signs from your Shark vacuum that says it’s time for its filter to take a bath. These include:
Also, take note that the manufacturer states that Shark vacuum cleaners never lose suction. So, if yours do, then you might want to check just how dirty its filter is. How To Clean Shark Vacuum Filters?Cleaning The Pre-Motor FiltersRemove the Filters To start on how to clean Shark vacuum filter, you first need to remove the dirt canister. In most Shark vacuum cleaners, there are 2 pre-motor filters— one foam filter and one felt filter. These filters prevent dust and dirt from entering the vacuum’s motor. Hand-washing Filters After removing the filters, you can just hand-wash them under cool water tap until the water runs clear. Some people like to wash these filters in soapy water in order to give them a thorough cleaning. You can do, but remember to wash both filters carefully, especially the filters made of felt as they are easy to get deformed or damaged. Once cleaned and rinsed, the filters should be able to return to their white or near white appearance. Don’t worry as long as they’re not broken or torn. Air-Drying After washing, you need to air dry them for at least 24 hours. Then put them back when they are totally dry. Wet filters are the perfect breeding ground for filters causing the vacuum cleaner to produce a musty smell when in use. It is highly recommended that you clean the pre-motor filters every month for the optimal performance of your vacuum cleaner. Read More:
Cleaning The Post-Motor FilterAfter cleaning the pre-motor filters, it’s time to clean the post-motor filter. Depending on the model of your Shark vacuum, it can be the HEPA standard. As you probably know, HEPA filters are high-end filtration systems that are useful for allergy or asthma suffered since it is capable of trapping up to 99.7 percent of allergens, dust, and other small particles. Most Shark vacuum cleaners usually have one. And like any vacuum filters, HEPA filters also need some cleaning. 1) Locate The Filter Typically, you can find the HEPA filter located near the vacuum’s motor. However, the location can vary depending on the model so make sure to take a look at your user’s manual. 2) Removing the Filter Carefully remove the filters and set them aside. Gently tap the filter to remove collected dust and dirt. 3) Washing The Filter You should wash the filter under running water, rubbing it gently with your fingers in order to get rid of all the dirt and dust out. Some people use soapy water. However, it is not recommended to use soap or detergent while cleaning these filters since it can affect its functionality over time. Read Here: Shark vs Dyson Vacuum Comparison Cool running water is the most effective and best method. You’ll know the filter is clean when you see that the water running through the filter is already clear and clean. 4) Air-Drying After that, carefully tap the filter to remove excess water. Then, allow the filter to air dry. HEPA filters take much longer to dry, and it should take over 24 hours. It is crucial that the HEPA filters should be completely dry before you put it back into the vacuum cleaner. As mentioned before a wet vacuum filter is the perfect breeding ground for mildew and mold, causing the bad, musty smell when vacuuming. Read More:
ConclusionAs you can see, cleaning your Shark vacuum filter is quite easy and simple. However, the assortment of Shark models means that the actual process of accessing and removing the filter may be a bit different from one model to another. And this will depend on their designs. Thus, it is advised that you check your user’s manual so you know exactly where each filter is located and how you can access and remove it. Once you cleaned all the filters, you’ll notice a change in the vacuum cleaner’s suction power. Because the filters are now clean and free of dirt and dust, the air is circulating freely. In addition, you’ll experience an odorless vacuuming. The post How to clean shark vacuum filter – A Step by Step Instruction appeared first on Vacuum Cleaners. via Vacuum Cleaners https://relentlesshome.com/how-to-clean-shark-vacuum-filter/?utm_source=rss&utm_medium=rss&utm_campaign=how-to-clean-shark-vacuum-filter 
When looking for a reliable and affordable vacuum cleaner, you really can’t go wrong with Shark vacuum cleaners. They provide you with similar functionality and power to a Dyson vacuum cleaner, but at a fraction of the price. However, like any other vacuum cleaners, Shark vacuum cleaners can also find itself lagging in performance. Shark vacuum not sucking is one of the main problems for homeowners. Read More: Best Vacuum Under $150: Top 5 Editor’s Picks So, if your Shark vacuum is starting to lose its suction power, this article will tell you a number of reasons why. Shark, as per manufacturer’s claim never lose suction, unless there is an underlying problem you need to fix. So, today, we will be looking at the common reasons why the Shark vacuum has lost its bite and the accompanying solution. Read More:
4 Reasons Shark Vacuum Not Sucking and How To Fix It1) Empty The CanisterIf your Shark vacuum ever loses a bit of power or the Shark vacuum not sucking dirt and dust as it should be, then the first thing you need to look at is the dust bag or dirt canister. You can’t expect any vacuum cleaner to keep sucking up dust and dirt when the bag or canister is about to burst at the seams. It is always recommended that you don’t allow the canister or dirtbag to get so full that your vacuum cleaner starts to struggle to properly function. It is suggested that disposing of the mess when it’s at least ¾ full is the best way to go to prevent Shark vacuum not sucking and to ensure the longevity of the machine. 2) Look For A BlockageAs powerful as the Shark vacuums are, they are still no match for things such as a whole cookie, Lego pieces, socks, and anything else that your kids can leave on the floor or under your sofa. These large pieces can cause blockages in your vacuum cleaner and cause poor suction power. If thinking about blockage, there are 1 of 2 places that it’s most likely going to be.
Again? Yes again! But we’re not talking about emptying the canister this time. Specifically, we’re talking about the air duct that’s in there which could be the best spot for a blockage. Remove the canister and examine the place where the dirt comes in, checking for any possible blockages. You might want to wear gloves for this one since that place can be a build up of icky mess.
Just behind the brush roll of the vacuum cleaner is the air intake, which is also a great place for slightly larger bits of mess to get stuck— clumps of hair, hard food, toys whatever item your powerful Shark vacuum tried to suck. First, you can get a pair of scissors to try cutting hair clumps or breaking up the large food pieces. Or use a stick to push it out of the air intake and remove the clogging. Once you remove the blockages, perhaps you’d also like to clean those icky parts. Not only should it help maintain your vacuum cleaner’s suction power but also prevents your cleaning from smelling nasty. Read More:
3) Cleaning The FiltersShark vacuum cleaners have some of the best filters available on the market right now. However, that does not mean that you should look pass through it. It still needs some maintenance from you to keep working at its best. If it has been a while since you last cleaned up your vacuum’s filter, then it could be the main culprit for your Shark vacuum not sucking. In order to clean it, you first need to remove both foam and felt filters from the vacuum cleaner. Give them a good clean by running them through clean water, making sure that all dirt and dust are removed. Take extra care when washing the felt filter. Read More: 10 Best Vacuum for Hardwood Floors and Carpet Now, the following steps are important: Ensure that the filters are completely dry before putting them back into the vacuum cleaner. Usually, this will take at least a day to complete. Never put wet filters back as it can be the perfect breeding ground for molds and mildew, causing your vacuum cleaner to release a strong musty smell whenever in use. 4) The Motor Is Giving UpShark produces excellent vacuum cleaners, plus, you will get most years of service out of them. Like any appliances, however, they won’t last forever. So, if you’ve tried all of the above tips and giving your vacuum cleaner a thorough cleaning and still have poor suction performance, then it sounds like the motor might be broken. There are replacement motors available, however, they can be very expensive, plus really difficult to install if you don’t know what you’re doing. If the motor is the main culprit for your Shark vacuum not sucking any dirt or dust, then it is probably better to purchase a new Shark vacuum cleaner instead of prolonging the life of your dead vacuum cleaner. Honestly speaking, the cost of a new Shark vacuum motor is not actually cheaper than getting a new Shark vacuum anyway. Read More:
Regular Cleaning and Maintenance Keeps Your Shark WorkingAlthough there are a few main reasons as to why a Shark vacuum not sucking dirt or dust, you can see that regular cleaning and maintenance are what prevent such a problem in the first place and keeps it running for a long time. It is suggested that you give your Shark vacuum cleaner a good and thoroughly clean once a month. While some people check and clean it every 3 – 6 months, taking the time once a month to clean the filters, check for blockages, and making sure that the canister or dirtbag is nice and clean can help you get more years out of your vacuum cleaner. In addition, ensuring that the vacuum filters and dirt canister clean and that there are no blockages in it puts less stress on its motor, meaning that your Shark vacuum cleaner is going to last a lot longer than most! The post Shark Vacuum Not Sucking – How To Fix It appeared first on Vacuum Cleaners. via Vacuum Cleaners https://relentlesshome.com/shark-vacuum-not-sucking/?utm_source=rss&utm_medium=rss&utm_campaign=shark-vacuum-not-sucking 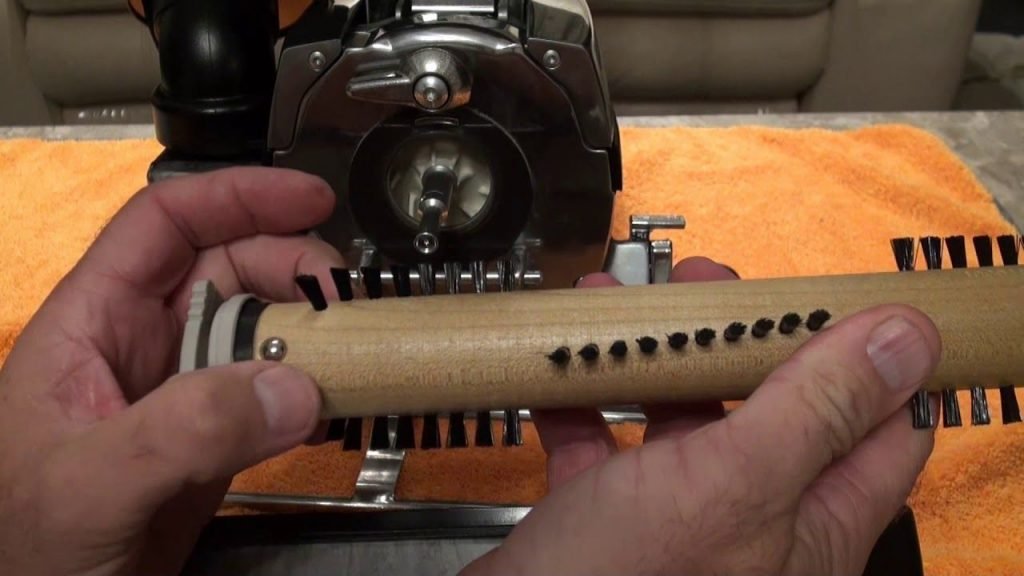
Are you having trouble with your Kirby vacuum cleaner? Kirby vacuum cleaner won’t turn on? Today we will go over a few common problems that keep your Kirby vacuum cleaner from working the way it should. But first… Important Safety Tips To Consider
Read More:
Troubleshooting 101: Kirby Vacuum cleaner won’t turn on1) Check The Safety SwitchesSafety switches in Kirby vacuum cleaners are the number one reason why a Kirby Vacuum cleaner won’t turn on. The switch has 2 safety features that won’t allow the vacuum to start. It prevents dust or dirt in the air from raising and causing mess if the bag is not installed or stop the risk of injuries if someone is trying to turn the vacuum cleaner on with an exposed motor shaft or fan. Read Here: Kirby vs. Rainbow – which is the better option? Take note that both switches should be pressed. Otherwise, the Kirby Vacuum cleaner won’t turn on.
Removing the bag, you will notice a tiny switch on the vacuum cleaner. There’s a tab on the bag, pushing the switch forward when properly attached. This feature won’t allow you to operate the Kirby vacuum if you don’t have a bag installed or the bag is not completely locked onto the vacuum exhaust. To ensure that the bag is properly locked, it will need to be properly aligned on the 3 brass tabs, so you need to press it to the vacuum as far as it can go. Now, if the exhaust gasket isn’t well-lubricated and/or the plastic bottom is a bit tight, you can use oil to lubricate this part and give it a strong push. Set the bag on the 3 tabs and turn it clockwise until you feel it lock into place. Now, if any of these tabs are broken, then the bag may not engage the safety switch. In addition, if you notice that the bag is popping back out of place easily, then it could be a sign that it’s already worn out and requires replacement.
On the front of the Kirby vacuum cleaner, there’s a switch divided into 2 sections— lower and upper. We’ll start with the switch behind the power nozzle. Releasing the belt, the latch, and the powerhead off, you will be able to see a safety switch. When putting the head-on, the small tab should press on the safety switch. It needs to be sticking out at least half an inch or so. However, if it looks short or has broken, jagged edge, then the tab is probably broken and is not engaging the safety switch. The solution here now is replacing the powerhead. If the tab looks intact, then you want to make sure that you are properly attaching the head. There’s a bar on the vacuum cleaner and 2 hooks on the powerhead. The hooks will need to be hooked over the bar. Raise the height of the vacuum to make it easier and attach the head. When the nozzle is properly installed, it presses on the lower part and the Kirby vacuum cleaner will operate at a lower speed. Don’t confuse it with the speed switch on the Diamond models of Kirby vacuum cleaners which would allow even lower speeds. Read Here: 10 Best Vacuum for Hardwood Floors and Carpet When a hose is installed, the Kirby vacuum cleaner will move to high speed and generates maximum airflow or suction that allows you to vacuum hard surfaces such as upholstery and floors. The hose will press on the top switch portion; however, it’ll make the lower switch lever go as well. If there are no nozzle or hose installed, these switches won’t be pressed and the Kirby Vacuum cleaner won’t turn on. Read More:
2) Check The Power CordIf you have checked the safety switches and the vacuum cleaner still won’t turn on, then you should check its power cord. First, unwind the cord and plug it in a socket. Try wiggling it around as you try to turn it on. If your vacuum turns on at some point, then you might have a short in the power cord. If that the case, consider going to a qualified technician to replace the cord of your Kirby vacuum cleaner. 3) Faulty MotorThere are 3 factors that lead to a malfunctioning of the cleaner motor on a Kirby vacuum cleaner. The first is with the on and off switch of the machine. To test it, you will need a multimeter— an electronic tool measuring amps, voltage, and resistance through circuits. You can use this multimeter to test the vacuum cleaner’s power switch for continuity. The power switches are typically the main culprit and should be replaced if it does not turn on and off properly. Now, if the power switch is intact and is generating electricity, then the next probable source of the problem could be the drive motor. To check for motor failure, see If the blow wheel turns with ease and does not have any obstructions. However, if the motor looks good and turning without an issue and the power is going through the motor but the machine still won’t turn on, then the replacement of the motor might be necessary. Make sure to visit a qualified technician to do the replacement. The third and last potential cause of a malfunctioning Kirby vacuum cleaner that does not clean well or will not turn on altogether is its fan motor. The fan motor generates the suction power, so if it is malfunctioning or damaged, then there could be a loss of suction or a dead vacuum cleaner. If your Kirby vacuum cleaner is still under warranty, then consider contacting your local Kirby office and let them know that you need replacement parts and servicing. Read More:
The post Kirby Vacuum Cleaner Won’t Turn On? How To Fix It appeared first on Vacuum Cleaners. via Vacuum Cleaners https://relentlesshome.com/kirby-vacuum-cleaner-wont-turn-on/?utm_source=rss&utm_medium=rss&utm_campaign=kirby-vacuum-cleaner-wont-turn-on |

ABOUT USGet the best home decor ideas and product review, perfect home accents to celebrate your individuality from farmhouses bathrooms, dining rooms, DIY projects gardens storage ideas and more. |
 RSS Feed
